| Index Henley Ariel Awning Furniture Bulbs Geneology Centre Personal Bronze Bike Palladium |
|
 |
 |
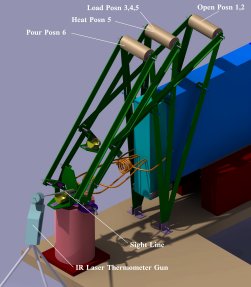
1.Load Position 2. Load Position Top Plate Rotated 3. Load Position Crucible Lowered
The sequence starts with the linkagepushed back and the centrifuge plate rotated away exposing thecentrifge interior.The investment with the lost wax hollow is removed from the brnout oven and lowered into the centrifuge (see pic 1 above). The top plate of the centrifuge is rotated into position and llowered down using the handle on the side of the centrifuge (see pic 2 above). The quick release clamps are in the UnClamp position in pic 2. The linkage is then pulled forward until the upper brackets mate with the quick release mechanism and the quick release clamps are clamped (see pic 3 above)
4. Crucible ready to load with charge 5. Crucible being heated 6. Crucible in Pour position
The crucible is now ready for the charge (silver or palladium) to be added (see pic 4 above). Then the crucible and charge is slid forward into the induction coil and the induction heater is switched on. The temperature of the charge is measured using the IR temperature gun, sight line shown in black (see pic 5 above). Finally some ten seconds before the temperature gun indicates pouring temperature the centrifuge is swirched on. At pouring temperature the linkage handle is pushed forward into the pour position and the molten charge flows into the centrifuge via gravity..

Linkages in three positions Open, Load and Pour
Page created on
02Mar23 | Last modified on 02Mar23 | Visited |
Any comments to: Webmaster@smuin.demon.co.uk |